Customize your Rae Dunn for Valentine’s Day

I got my very first piece of Rae Dunn pottery for Christmas this year. I’ve been looking at how to DIY Rae Dunn type things for a while and pinning everything Rae Dunn before that, but now I have one. Trouble is, what can I do with one piece?

I got the “faith” mug. Isn’t it cute??? But when I think Rae Dunn, I think of all the ways I can use it to decorate seasonally. And don’t you need a dozen or more pieces to be able to do that? Actually, no. You don’t!

Last month I shared with you how I used my one Rae Dunn mug in a winter vignette. When February was approaching, though, I took some pictures of the process for you. (Just meant to share them earlier in the month!)

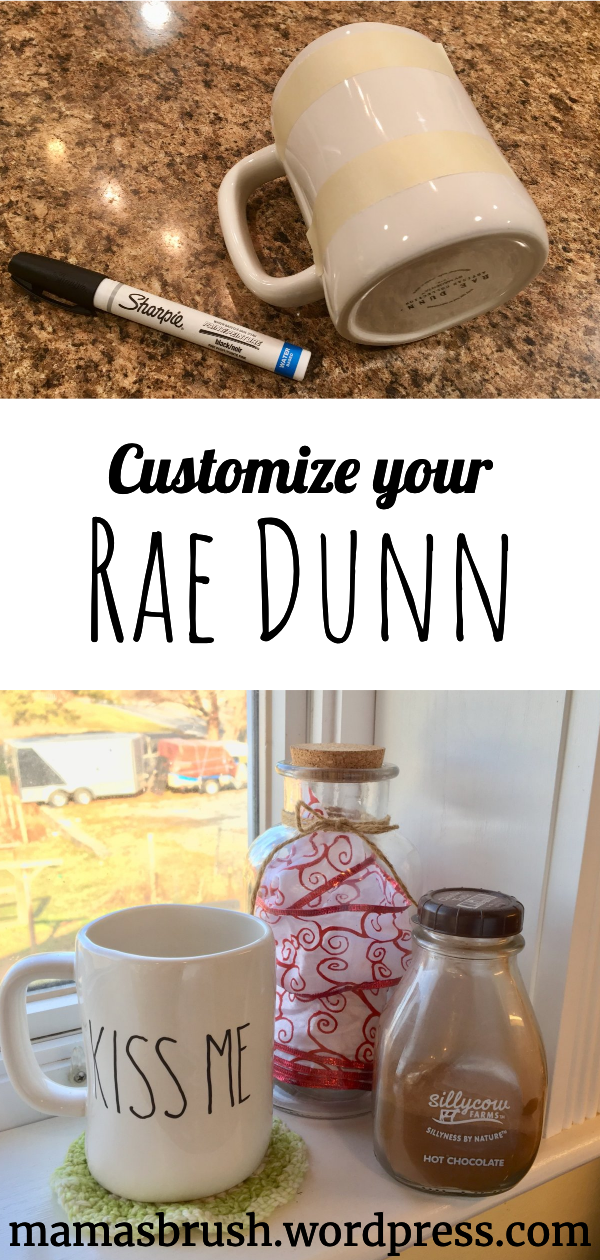
In the pictures above, you see the word “Faith” on the right. It’s a great word, but I was looking for something else for Valentine’s decor. The left picture shows you something else… a blank canvas!

Customize your Rae Dunn | mamasbrush #RaeDunn #mug #diy #tutorial #decor #valentine'sday

So I grabbed some masking tape and my water based Sharpie paint pen and got to work. (***Note: water based will wash off, oil based may not. Make sure you have the water based paint pen!!!) You could measure, but I just eye-balled the taping to get mostly strait and just far enough apart.

Customize your Rae Dunn | mamasbrush #RaeDunn #mug #diy #tutorial #decor #valentine'sday

Then I used my most Rae Dunn like writing (notice it isn’t the exact same, but it’s good enough for me) and wrote “kiss me” on the cup. If you mess up, just get a paper towel damp and clean it off to start over.

I did notice that it bled when the paint pen touched the tape, so I tried to be careful not to get so close the second time. But even then, I just folded up a paper towel, dipped it in a bit of water and cleaned up the edges after pulling the tape off.

Customize your Rae Dunn | mamasbrush #RaeDunn #mug #diy #tutorial #decor #valentine'sday

And I was done (or should I say “Dunn”?) Not sure yet what it will say with spring around the corner, but you can be sure it will be something.

Okay, so I wasn’t completely done…

Customize your Rae Dunn | mamasbrush #RaeDunn #mug #diy #tutorial #decor #valentine'sday

While I still had my supplies out and was still itching to decorate (I don’t have much Valentine stuff) I pulled out a couple of my little white bowls. I stuck a piece of masking tape around the bottom to give me a straight line and I added words to them too.

Customize your Rae Dunn | mamasbrush #RaeDunn #mug #diy #tutorial #decor #valentine'sday

They make me smile! 🙂

Pin it Button from mamasbrush
Customize your Rae Dunn | mamasbrush #RaeDunn #mug #diy #tutorial #decor #valentine'sday

Gathering here.

Take a Hike – How I Made a Sloped Birthday Cake

Turns out I had to come up with my own plan for this hiking theme cake. I searched and searched for ideas. I have some on my Hiking Party Board, but nothing was going to work with the time available and I didn’t need 30 people worth of cake. In addition to that, I made a camping theme cake several years ago for the same kid, so I wanted it to be different. (aka no tents)

Hiking Trail Cake -- Easy Hiking Theme Birthday on a Budget

As I mentioned earlier this week, the end of July we spent with our oldest daughter in the hospital, leaving very little time for preparing for this birthday. I made the cake (from a box mix) the night before, but I set the temperature wrong and it turned out dry. This set me behind. Usually I freeze the cakes before assembling and frosting them, but after our birthday breakfast we made a new cake (thankfully we had a back up box of cake mix!) and set it to cool on the counter.

First of all, I baked the cake with these even-bake strips from Wilton. They help the cake to rise more evenly. After lunch I was ready to begin frosting the cake. I leveled my cake layers like this (a great video about leveling and frosting cake layers.) I set the tops off to the side to be used later (I had to guard them well as there were several children floating around looking for scraps. )

Frosting the layers was little trickier since they weren’t frozen, but it worked. I did something different for me this time and used a piping bag to pipe the frosting between the layers. (Here is another great video about frosting cakes.) Piping it on helped greatly since the cake wasn’t frozen and was apt to fall apart as I spread. I’m still not great at all the techniques of cake decorating, but I’m having fun learning with each new birthday. 🙂

The Layers

[Ack! There are no pictures of the process. Time was short and I was working as fast as I could to get done in time for an early dinner and celebration. But I’ve drawn pictures for you… I hope they help!]

One of the cakes was falling apart on one side (whether this happened coming out of the pan or with the help of one of my smaller children is undecided). It worked out though, because I used that spot, after the second layer was on, to cut and shape a slope out of that layer down to toward the first layer(see diagram… these are not to scale!!).

Then I frosted only part of the top in a semi-circular way. Then I placed one of the cake tops (saved from before) on top of the frosting and trimmed away the cake that went over the side.

I then added frosting to that layer and repeated with the second cake top saved from before, but I offset it even further (see diagram… still not to scale!!). Then I trimmed away the rest of the cake top and handed out scraps to the hovering children.

This is what it looked like from the side when all the layers were ready.

I then applied the crumb coat and stuck it in the freezer for 20-30 minutes to harden so that I could finish the decorations (and make more frosting.)

Hiking Trail Cake -- Easy Hiking Theme Birthday on a Budget

I frosted the whole thing with a light green buttercream frosting I made from scratch.

the Creek

On top of that I used blue cookie frosting we already had on hand. I don’t recommend this particular icing, though, because it took a long time to set and ended up sagging down the slope after the pictures were taken. I can already tell in this photo that it had begun. I picked a random place on the cake for the creek and worked a line across the cake and down to the cake plate. Then I just did that several more times to make it thicker . The lines of it melded together nicely.

Hiking Trail Cake -- Easy Hiking Theme Birthday on a Budget

The Path

I mixed in some white buttercream with chocolate frosting I had in the freezer, left over from another birthday, and it made for a nice “path” color. I piped that onto the cake, making sure to cross the creek, and ended it in a larger area at the top. The kids decided that the picnic tables would go there (the imaginary ones). 🙂 My oldest son figured out how to cut a pretzel so that we could use it for the bridge. Good luck with that, mine kept breaking! 🙂

How I made a Sloped Cake for a Hiking Themed Birthday

The trees

For the trees on the cake I used left over Cupcake Icing we had from another birthday and used the star tip that came with it. I don’t know what color it was because I used the last of it and threw it away, but it was super handy for a quick decorating job. You could do the same thing, though, by making your own frosting and using a star tip. It worked a lot like “spray cheese.” I made both the trees on top of the cake and the ones on the tall side of the cake. Then I put “bushes” around the cake on both sides of the creek until I ran out. The trunks on the back trees are the chocolate frosting I had kept back before adding the buttercream to make the lighter brown for the path.

How I made a Sloped Cake for a Hiking Themed Birthday

A few hints on tree placement:

1. I put several “trees/bushes” close together at the start of the creek to give the illusion that it started there in a hidden spring under the trees.
2. I put a tree in the crook of the path to give a reason for the sharp bend in the path.
3. I put several trees at the top around the “eating area” of “path” frosting to mimic a shady picnic area.

Do you have an event coming up that could use a sloped mountain or hiking cake?? Pin it for later. 🙂

Pin it Button from mamasbrush
How I made a Sloped Cake for a Hiking Themed Birthday

Gathering here.

Recommended Reading:

Easy Hiking Birthday Theme on a Budget
Mountain Rice Krispies Treats
Birch Log Pretzels
Get Away to the Mountains Simple Watercolor Painting

Easy Watercolor Flowers YOU Can Paint

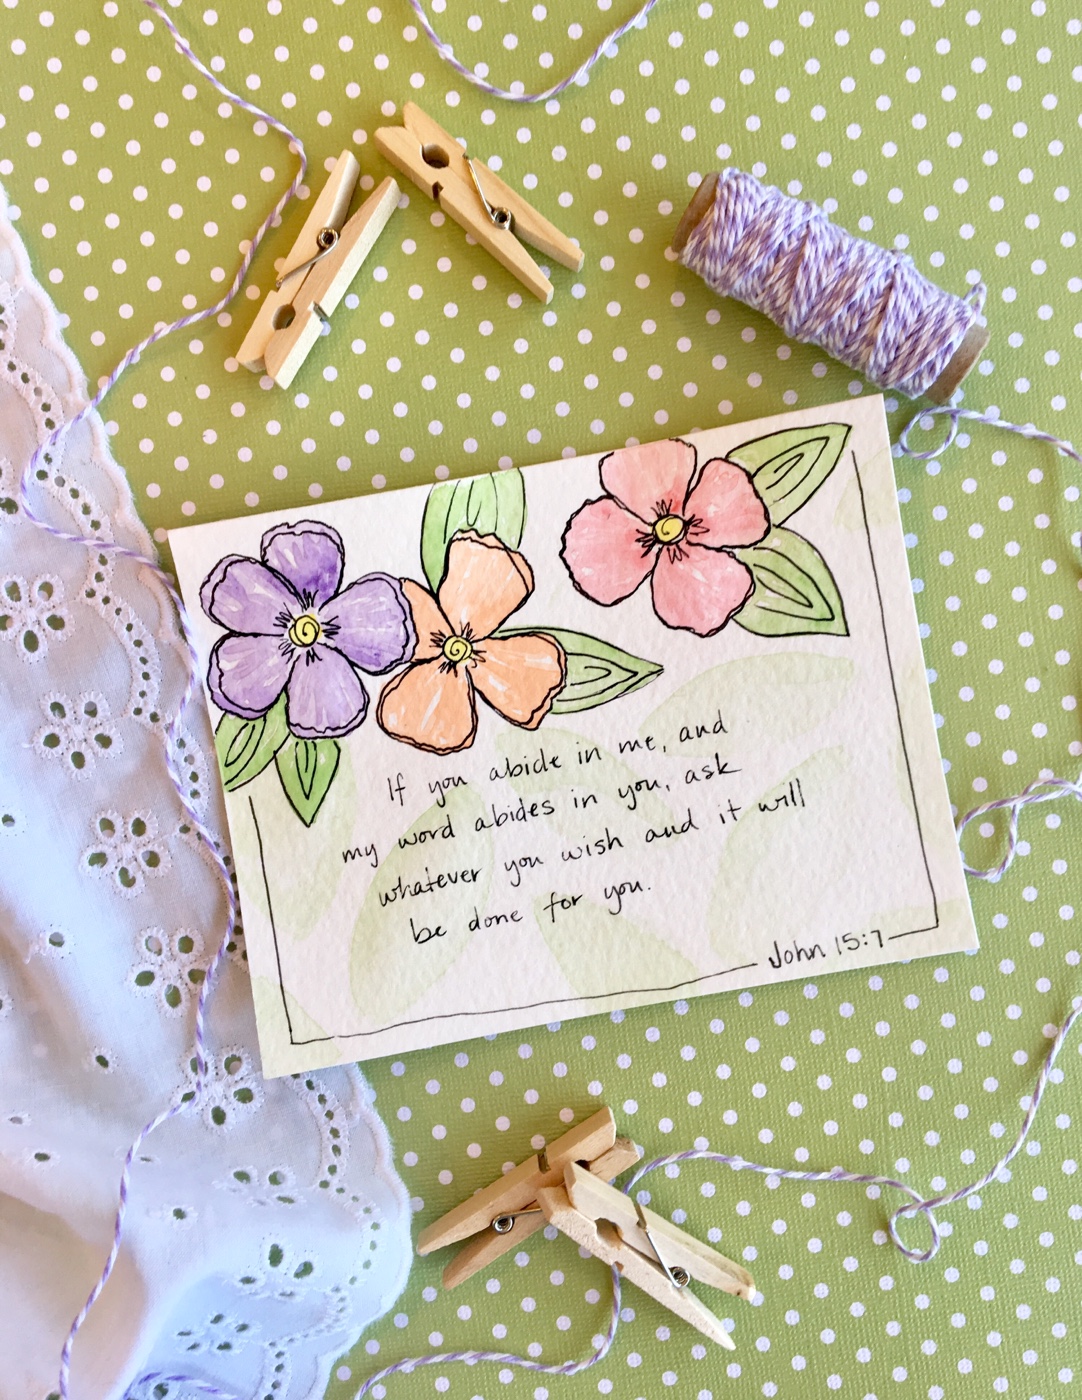
I painted these cards for a party we attended this weekend for a graduate in our church. I sat down Friday night with no inspiration of what I wanted to make. What I ended up with an hour later was easy watercolor flowers YOU can paint. I didn’t start out to make a tutorial (the party was the next day), so I don’t have pictures to share of the process, but I want to talk you through what I did, because these really are Easy Watercolor Flowers YOU Can Paint!

I painted this whole thing without a pencil drawing. This makes it easier for me because I don’t have to worry about getting the petals just right when the time comes.

Getting Started

The first thing I did was to paint yellow dots where I wanted my flowers. If you are making a greeting or verse card, give some thought to where you want your flowers, if you are practicing, just put them anywhere. They would be cute in a semi-strait line across the middle of your work space. Remember to leave space between the centers for the petals for each flower.

Let the yellow paint dry.

Adding Petals

When the centers are dry, you can begin to paint the petals. I chose a color palate ahead of time and thought through where I wanted them. I begin by painting the outline of the petals where I want them, sometimes 4 petals, sometimes 5. You can do what you like.

If the petals aren’t exactly the right size or shape, just add more paint and change them a bit (this is why I like painting with pencilwork first.) When I am filling in the color on the petals, I try to leave white spaces for a little textural interest.

Stems

While allowing the petals to dry I worked on the stems and leaves of this card. I am careful to leave a little gap between the still trying flower and the green of the stem, otherwise the colors will bleed together. I simply used the very tip of one of my size 7,8, or 9 brushes (though you could use a smaller one if you are more comfortable with it.)

I dragged the tip downward from the flower to the bottom of the card. Be careful to draw an imaginary line from the center of your flower through the petals so your stem placement is realistic. Go back and add paint to make it darker, or more water for thicker stems as needed.

Easy Watercolor Flowers YOU Can Paint -- My Creative Process at mamasbrush.wordpress.com

Leaves

I first added leaves to the stemmed flowers because they are further removed from the wet paint of the petals. I chose a very traditional leaf shape and deliberately left them running off the edge of the paper and behind a nearby flower (though you need to make sure the flower it touches is dry first).

Easy Watercolor Flowers YOU Can Paint -- My Creative Process at mamasbrush.wordpress.com

For the leaves on this card, I waited for the petals to dry and added leaves coming from behind the petals. Do you see the faint leaf behind the others on the purple flower on the left? That was the original leaf for that flower and it was way too big. I added a bunch of water and tried lifting the already dry paint with a paper towel, but it didn’t lift all of it. I was a little disappointed that I’d ruined the card, but I moved ahead and added the smaller leaves instead, just for practice.

Fixing “Mistakes”

I set it aside to dry while I worked on other details, and while was working I had an idea. I decided to paint very faint large leaves all over the background of the card. I painted with a lot of water, let it sit a moment or two, then dabbed it up with paper towel. Not only was the card not ruined, it was the one I decided to use for the graduation party. When you find that you’ve made a mistake of your own, set it aside for a bit and see if you can brainstorm a way to make it part of your design. You may just like it better than your intended design! 🙂

Easy Watercolor Flowers YOU Can Paint -- My Creative Process at mamasbrush.wordpress.com

Another layer of color

When everything was dry, I went back in and added another layer of color to each of the elements. For some of the flowers I went around the edges with a darker color (see the purple flower on the bottom card). For others I made streaks of darker color coming out from the middle (the purple flower on the top card. For others still, I gave an extra layer of color on half of each petal. For the leaves, I added another layer (or two) of green on one half of the leaf. There are so many ways to do this, just experiment and see what you like!

Easy Watercolor Flowers YOU Can Paint -- My Creative Process at mamasbrush.wordpress.com

Finishing Touches

This is when I add my pen work. I usually do this the next day, since I do most of my painting late at night. The trick is to make sure your painting is completely dry! For the leaves I think a pointed version of a spiral is fun. For the petals, I trace each one twice, sometimes staying right on top of the first line, other times leaving a gap all around or even just on the end. I think this makes it look like the petals are curved around on the ends. I add some squiggly lines at the base of each petal and a spiral at the center.

My goal for these finishing touches was to make the painting cute and whimsical. If I wanted them to look a little closer to realistic, I may have used dots in the centers and simple vein like lines on the leaves. Go with what you like and have fun! Shayda Campbell once said, if I want it to look exactly right, take a picture. Painting is about giving it your own creative interpretation.

When all was said and done I added the verses I had in mind and the border. Since I was short on time, I just did a simple lettering and added the verse reference into the border as I like to do. I think it worked though. The flowers dressed it up enough and the lettering style didn’t distract from the painting or the message.

So will you try it??

Pin it Button from mamasbrush

Gathering here.

Easy Wafer Cookie Pencils for Back to Homeschool

Easy Wafer Cookie Pencils for Back to Homeschool

These adorable Easy Wafer Cookie Pencils for Back to Homeschool were super easy to make and so fun for the kids on our first day of school!

With the the approach of the 4th of July and all the other summery goodness, comes the start up of a new homeschool year for us. But who has time to spend blogging in real time? What? People DO blog in June? I don’t know how you all do it. I actually did post 3 times in June and I’m pretty sure other more important things didn’t happen because of it. June is just crazy for our family!

Easy Wafer Cookie Pencils for Back to Homeschool

That’s right, we start school July 1st around here. (Pop over here to find out why.)

Easy Wafer Cookie Pencils for Back to Homeschool

I saw the idea originally on Pinterest here, but you can find her amazing tutorial directly, by clicking this link.

As per usual, I didn’t click over to read the directions until after I’d done my own thing. That means I used different means to a similar end. 🙂

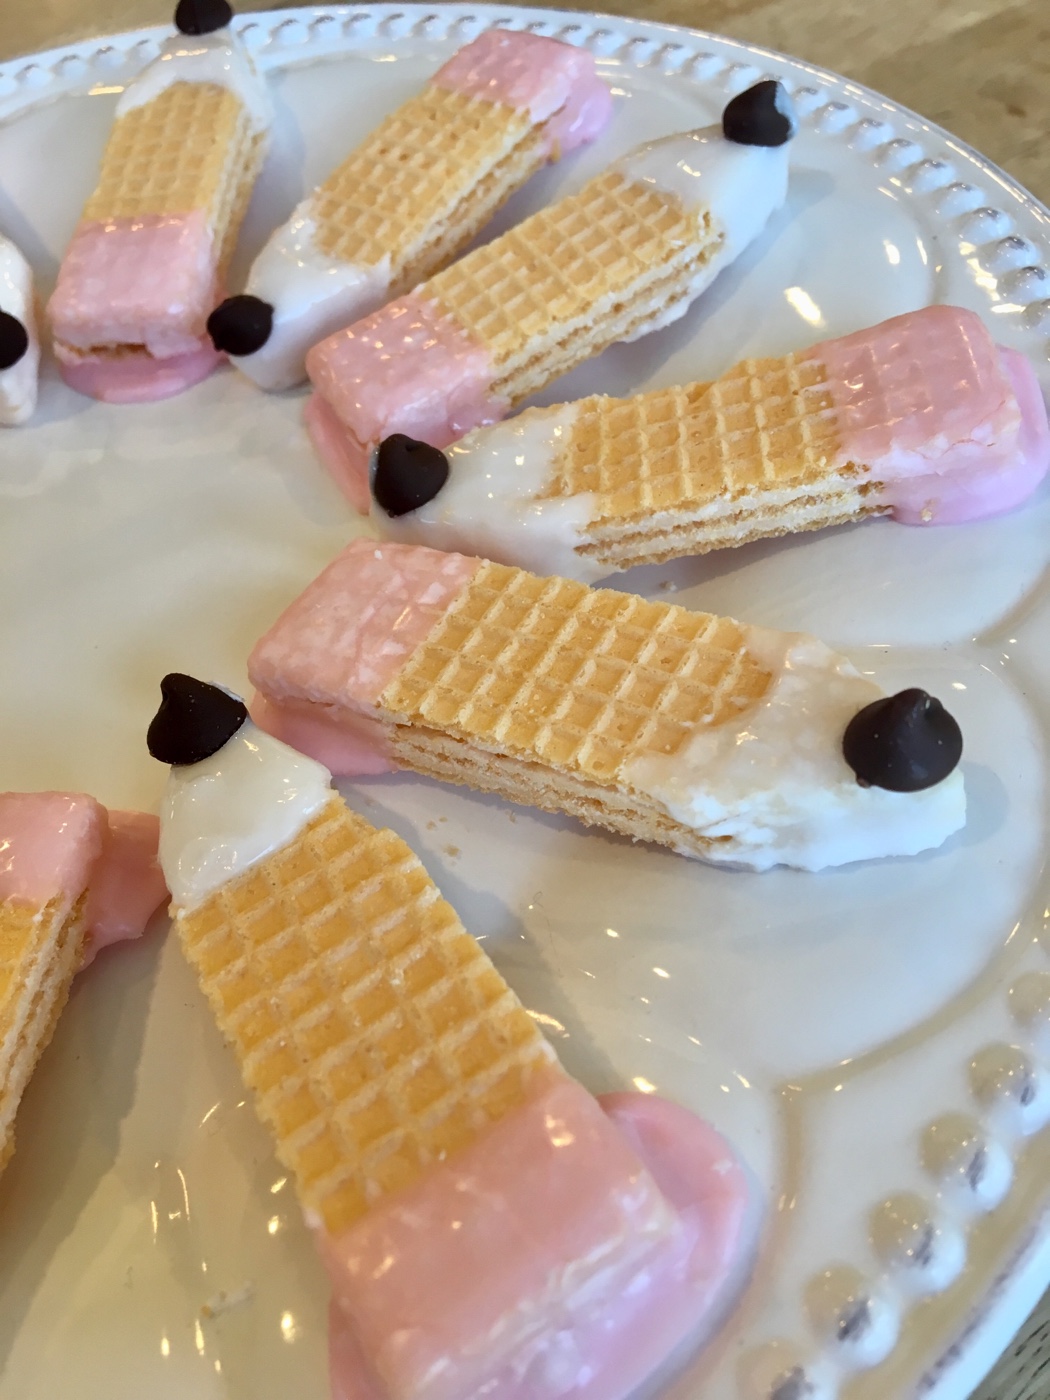
Instead of melting candies, I mixed up some powdered sugar and milk to make a simple frosting. I started with the white and dipped all the pencil tips. I then added the chocolate chip (mini chips would work better as Keri suggests, but I worked with what I had.) I put the sheet pan in fridge to set up after this.

A while later (30 minutes to an hour?) I added some powdered sugar and milk to the left over white frosting and then a bit of red food coloring. I had to go back and forth a bit on the amounts until I got the consistency I wanted, and even then it could have been thicker if I had been more patient.

I dipped the “eraser” side of the wafer into the pink and set them to dry on the lined cookie sheet.

Easy Wafer Cookie Pencils for Back to Homeschool

Then back into the fridge they went.

In the end I could have trimmed the run off of the pink frosting like I did for the white, but I figured the kids wouldn’t mind the extra frosting. 🙂 They turned out so cute and the kids love this little tradition we do for the first day of school (two years in a row establishes tradition around here. Good thing it’s easy.)

Easy Wafer Cookie Pencils for Back to Homeschool

To be honest, I had a dozen other ideas I wanted to do for the first day of school, but it’s a busy time and this is the only one I actually carved out time for. You can find all my fun back to homeschool ideas on my Back to Homeschool Board. I hope you will find some to make your first day of school special… whether you homeschool or not! 🙂

Pin it Button from mamasbrush
Easy Wafer Cookie Pencils for Back to Homeschool

Gathering here.

No Sketch Challenge: Watercolor Painting with a Summer Theme

Challenge: No Sketch Watercolor Painting with a Summer Theme

This collection of summer themed watercolor illustrations was a spur of the moment adventure.

The big kids were at summer camp, leaving me with the little three, ages 3-7. It’s been a long time since my oldest was 7. It was quite the adventure, and to be honest, while I had more chores to do without them here, it was like a mini vacation.

The kids wanted to paint, so instead of my usual “no”, I actually said yes. (Point for mom!) I grabbed their paint sets and got them some water and brushes and paper towels. Then I grabbed some for me.

But what would I paint. I don’t paint as much during the summer due to more demands on my energy, less time, and less inspiration. I just get more excited about painting the other seasons I guess.

I started with the little blue crab in the corner. It reminded me of our weekend in St. Michael’s, MD this past fall (you should totally go, by the way, super fun little harbor town!) From there it just sorta turned into a summer theme. I laid down some paint for a handful of illustrations and when one was dry, I added the next color or layer. (I like having more than one painting going at a time for this very reason!)

Challenge: No Sketch Watercolor Painting with a Summer Theme

The catch? Whatever I wanted to paint, I had to start with the watercolors. No pencil sketch first. My reasoning was lazy enough. I didn’t want to take a bunch of extra time getting things laid out. Who knows how long the kid’s attention span would last this time anyway.

Way back in the beginning, when I was just learning to paint, I painted like this all the time. I hadn’t fine tuned (ummm… still haven’t) my drawing skills and I didn’t know any better. I don’t paint like this as much anymore, mostly because I usually have a purpose to my painting and I want to sketch it out first to get the look and layout just right. But it is so fun to just paint. It frees me from the need for perfection (ahem) and lets me experiment. I have to remember two things when I paint this way.

Challenge: No Sketch Watercolor Painting with a Summer Theme

2 things to remember:

  1. It does have to be perfect. Things won’t be laid out just right or centered or anything. (Note the position of the palm tree to the cloud. If I was going to be all crazy, I might wish it was a smidge to the left, but who’s going to be like that?) And the end result doesn’t have to look exactly like the real thing… it’s my creative interpretation. (aka I can do what I want.)
  2. I don’t have to love every illustration in the end. There are a couple little illustrations on here that I really love and will probably scan for use later, or at least try to paint again sometime. (I think that tiny firefly is just adorable!) Others, I wasn’t happy with at all, and if I do them again, it will be to improve upon them. (The bee needs a lot of work people!)

So now it’s your turn! Grab a set of watercolor paints (your kid’s are fine!) some water and paper (I began my painting adventures with card stock if that’s all you have) and just start painting. It helps to have an idea or theme in mind to get you started, but paint anything you want. No sketching! And have fun!

Leave me a link to the pic in the comments if you upload it somewhere! I’d love to see it!

Pin it Button from mamasbrush
Challenge: No Sketch Watercolor Painting with a Summer Theme

Gathering here.

How to Style Patriotic Shelves for Cheap!

Today I’d like to share the patriotic shelf decor in my kitchen. Last fall my sweet husband made me these great shelves out of beams he removed from our old farmhouse fixer upper. I really LOVE them! They are American Chestnut… just beautiful! And it has been such a joy to play at decorating them for the seasons. (Check out how I styled them for Valentine’s Day.)

I styled them easily for fall and Christmas because I have a lot of decorations for those (though apparently I didn’t blog them. Sorry! I’ll try to do better this year.) But I’ve found that I don’t have much in the way of decor for the patriotic part of summer. While I’d love to go out and get everything I “need” for an amazingly decorated patriotic house, it’s just not practical. In reality, most of my house isn’t far beyond demolition and begs more for tidiness than for decoration. These shelves are a cute little space where I can bring in some seasonal fun. And I try to do it for as little money as possible.

My picks

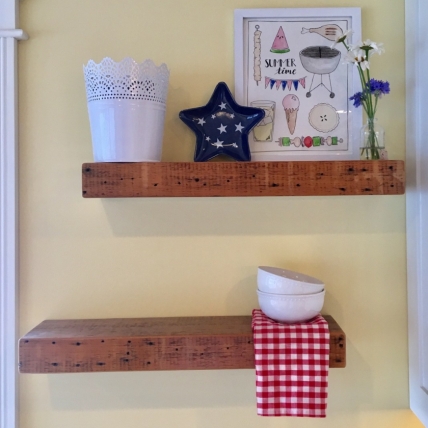
Starting from left to right, I found that medal, lacy looking bucket at Joann Fabrics in the spring collection 50+% off during a big Easter sale this spring. I’ve had something similar on my list for a while, so I spent the last of a gift card on it. I picked white over the mint green or pink so that I can use it throughout the year and not worry about storing it. It will probably travel around the house for various seasons and holidays.

Patriotic Shelf Decor for my summer kitchen and 4th of July

The artwork in the middle is one I created this year. (Head over here to grab up your own free copy!) I’m really happy with how it brings a summery feel to the kitchen.

The little jar with flowers in it I “stole” from my mom’s stash of little jars she keeps “just ’cause they are cute and we may want them for something.” And the flowers my 11 year old grows in our garden. Whenever they get tired looking, we just pick some new ones and bring them in. The colors are perfect! Forgive the pollen around them on the shelf… we can’t see it from where we stand. Apparently the shelves need a dusting. 🙂

And that cute star is another new purchase ($3ish). Our favorite grocery store, Wegmans, is selling them this spring for the summer season. It’s melamine, which I don’t usually use, but I just bought the one for putting on my shelf. (One or two little new things each year isn’t too bad on the budget.)

Patriotic Shelf Decor for my summer kitchen and 4th of July

Negative Space is okay

I’ll admit, I was starting to fret over not having “enough” to put on my shelves. Once I brought out everything I had for the Memorial Day/ Independence Day season, I was left with a sparse feel. What I wanted was a little layering. Instead of just laying everything out in a line to fill the space, I put some things behind and others in front. And wala, I didn’t have anything on the bottom shelf. So I did one more look around my kitchen.

Patriotic Shelf Decor for my summer kitchen and 4th of July

There was that single red check napkin and a couple of little dessert bowls from my new “fancy” dish set. I put them by themselves on the bottom shelf and the negative space beside it has really grown on me. I think it gives it a clean de-cluttered feel without feeling naked or bare.

The take away

When I begin styling, I start by gathering anything I have (however little or much) that may fit the theme. For the patriotic theme, I pulled together anything in red, white and blue. Different textures, heights, and thicknesses help. You don’t have to use it all, but just seeing things together may inspire you. If something doesn’t fit, put it away again.

Begin by putting the biggest items up first, then the middle sized things, and finish out with the smaller ones. Keep moving them around until it makes you smile. Sometimes this may take a couple days of playing with it. That’s okay too.

How do you style your favorite seasonal space for summer?

Pin it Button from mamasbrush
Patriotic Shelf Decor for my summer kitchen and 4th of July

Gathering here.

How to make an Easy Kitty Cat Cake from a Box Mix and Standard Pans

How to make an Easy Kitty Cat Cake from a Box Mix and Standard Pans

**UPDATE: You can find my new
Kitty Cat Party Pack
on my Etsy shop here!**

I know, I usually share my artsy stuff here, but really it’s my creative space. Where I can collect all the creative things I do into one place, for reference and for sharing. And I find that I can work in all sorts of mediums. Confections are a super fun one if you ask me. Bake the cake (or the cookies) and then use frosting to make them pretty! 🙂

This weekend we celebrated our youngest girl’s 7th birthday and she is loving cats these days. For months now we’ve known we’d be having a cat themed birthday. On Saturday we did the big part of her celebration, complete with Kitty Cat Cake. 🙂 I found my Pinspiration from Perfect Parties, but I didn’t think to read their instructions. They “torted” their layers (I learned what that means in their post) and included a strawberry filling. Check them out for some great ideas on a slightly more sophisticated cake.

Otherwise, read on to see how I did it super simple with a box mix and 2 nine inch cake pans. (Everyone said it was really good!)

How to make an Easy Kitty Cat Cake from a Box Mix and Standard Pans

I started with a yellow cake mix, but pink or white or marble or rainbow or whatever would be fine. You could even use brownies if you wanted to. We tried to make pink box mix cake, but it went flat, so I made a second with another box I had on hand. Follow box directions for prep, baking, cooling etc.

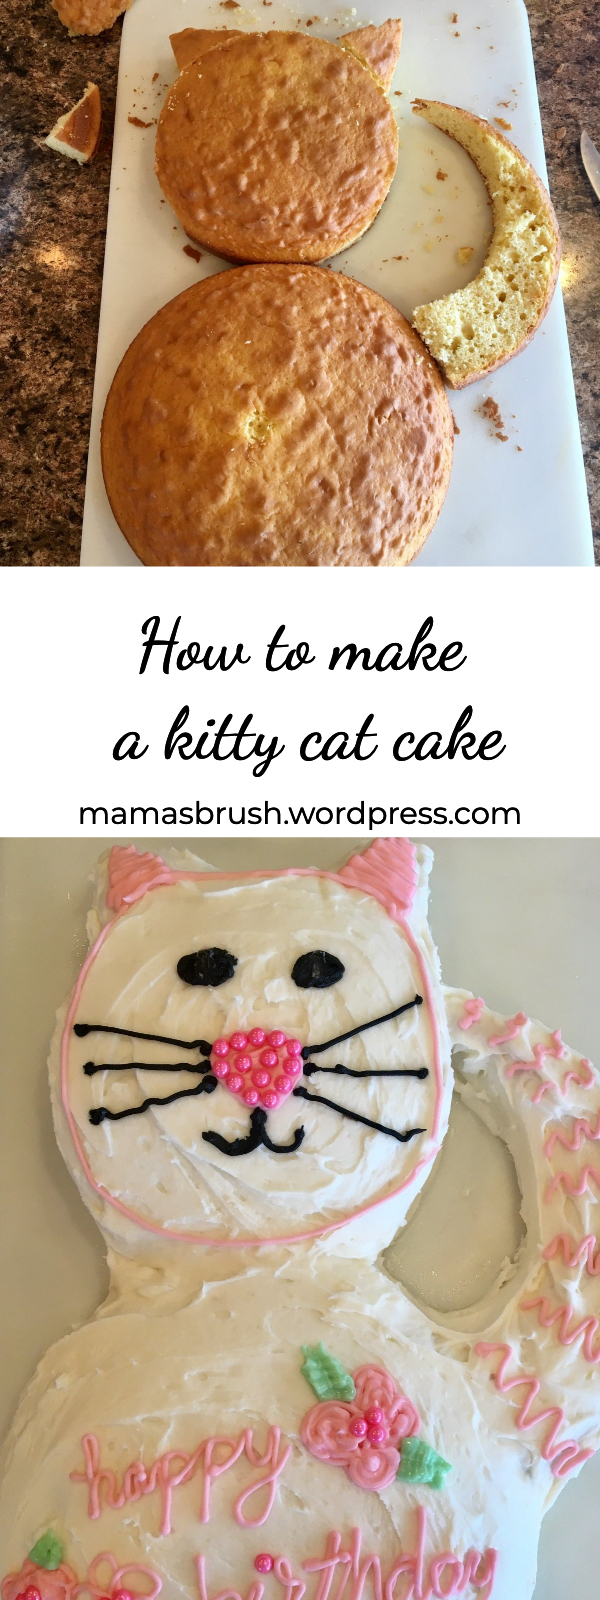
When they were cool, I used a bowl (Corelle cereal bowl for size reference) place on one of the cakes (at the edge, not in the middle) and cut around it with a steak knife. Then I cut two small triangles from the left overs for ears and used the rest of the edge for the tail. I did cut some off until it was the size I liked.

I didn’t cut the domes off to make the cats flat. I liked the rounded face and body, plus it was less “waste” (not that scraps of cake are ever wasted around here with myself and 6 children in the house.) But you could.

How to make an Easy Kitty Cat Cake from a Box Mix and Standard Pans

For frosting, I mixed up a recipe of American Buttercream (but your frosting of choice would work just as well I’m sure) and dollopped a bunch on each part and started spreading. It wasn’t a supper neat job, but I cleaned it up after. It was probably the trickiest part, but just keep at it, gently applying and spreading it over all the surfaces until it’s all covered (More is better for avoiding crumbs if you aren’t doing a crumb coat. It can always be scrapped off if it’s too thick.)

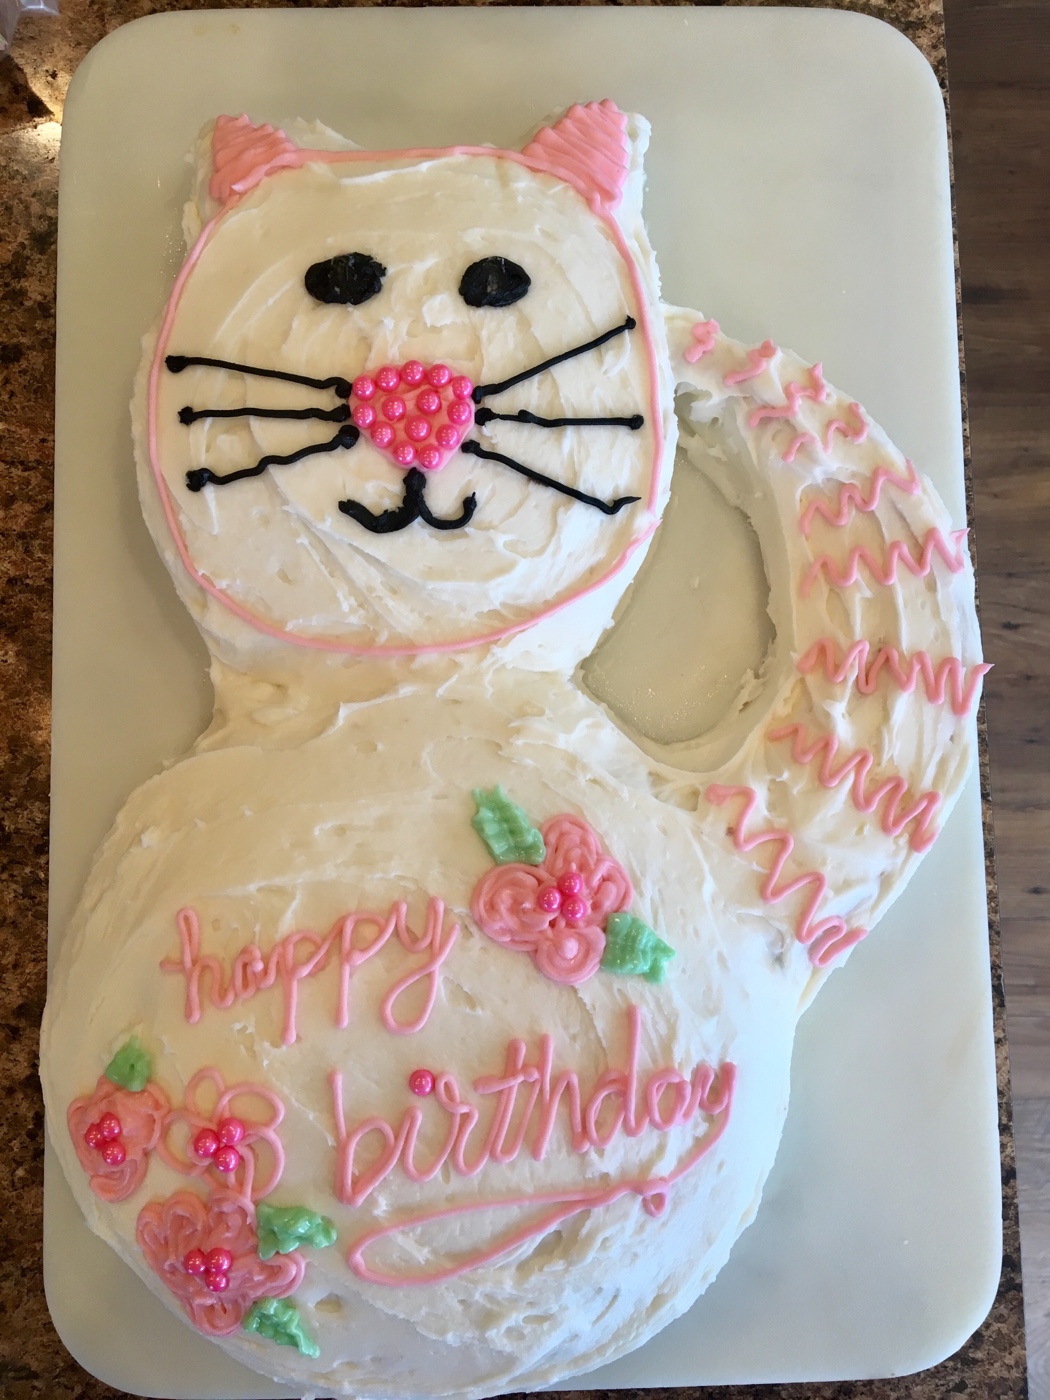
I added red food coloring to the rest of the frosting to make the pink and added the rest of the details. (I had green frosting in the freezer for the leaves, but you could separate your left overs to make some pink and some green.) You could do almost anything here, or leave it plain. I was supposed to make it a pink kitty, but forgot to color the frosting before I spread it on, so the details I added in pink were a sort of redemption attempt. She loved it and said it was fine. The pink balls are oversized sugar pearls.

***A word about making cakes (or about anything else) for your children: it doesn’t have to be perfect. Mine rarely are. Birthday cakes (and birthdays in general) are about making your kid feel special, not about making them look perfect. I’ve made some flops in my day (this year even), but kids have great imaginations (sometimes I tell them what it’s supposed to be and they get just as excited). Give it a try… you’ll get better every time. Anything extra you do is huge for them. And my kids are always more excited about something “mama made”. :)***

Gathering here.